Speed up your Ghost CMS website by integrating BunnyCDN. See how we tackled global load times and improved speed in a real world example.
A few months ago, someone in the Ghost forum asked if they could pick where their website is hosted when using Magic Pages. The short answer is, unfortunately, you can't. All Magic Pages servers are located in Europe. This is totally fine for anyone who is also located in Europe, but the further away you are, like in Australia, the longer it will take for a website hosted on Magic Pages to load.
This got me thinking about how to fix this without setting up servers worldwide, which is too costly for us, as a small business. The solution: Content Delivery Networks – or CDNs. Think of a CDN like a bunch of mini-stores spread out globally that have bits of your website. When someone visits your site, they get the content from the nearest store, rather than running all across the globe, which makes it faster for them.
So, I got to work to find whether I could implement this for Magic Pages. And guess what? I found one! I'll share how I made all customer websites on magicpages.co load fast from everywhere on the world – using a CDN called BunnyCDN*. The best part: anyone using Ghost – no matter if it's on a managed hosting platform or self-hosted – can do the same 🎉
Why I chose BunnyCDN to speed up my Ghost site
When I set out to find a CDN, it felt like there were a million choices. However, two big names caught my attention. The first one was Cloudflare, which is pretty much the biggest player on the CDN market. I'm already using some of their other products, so I thought, "Why not?" But then I saw the price tag. Ouch.
You see, I didn't just want to set this up for our own website; I wanted a cost-effective solution I could implement for all Ghost sites hosted on Magic Pages. And, because low running costs benefit everybody, Cloudflare's $20 per month and website was just too steep.
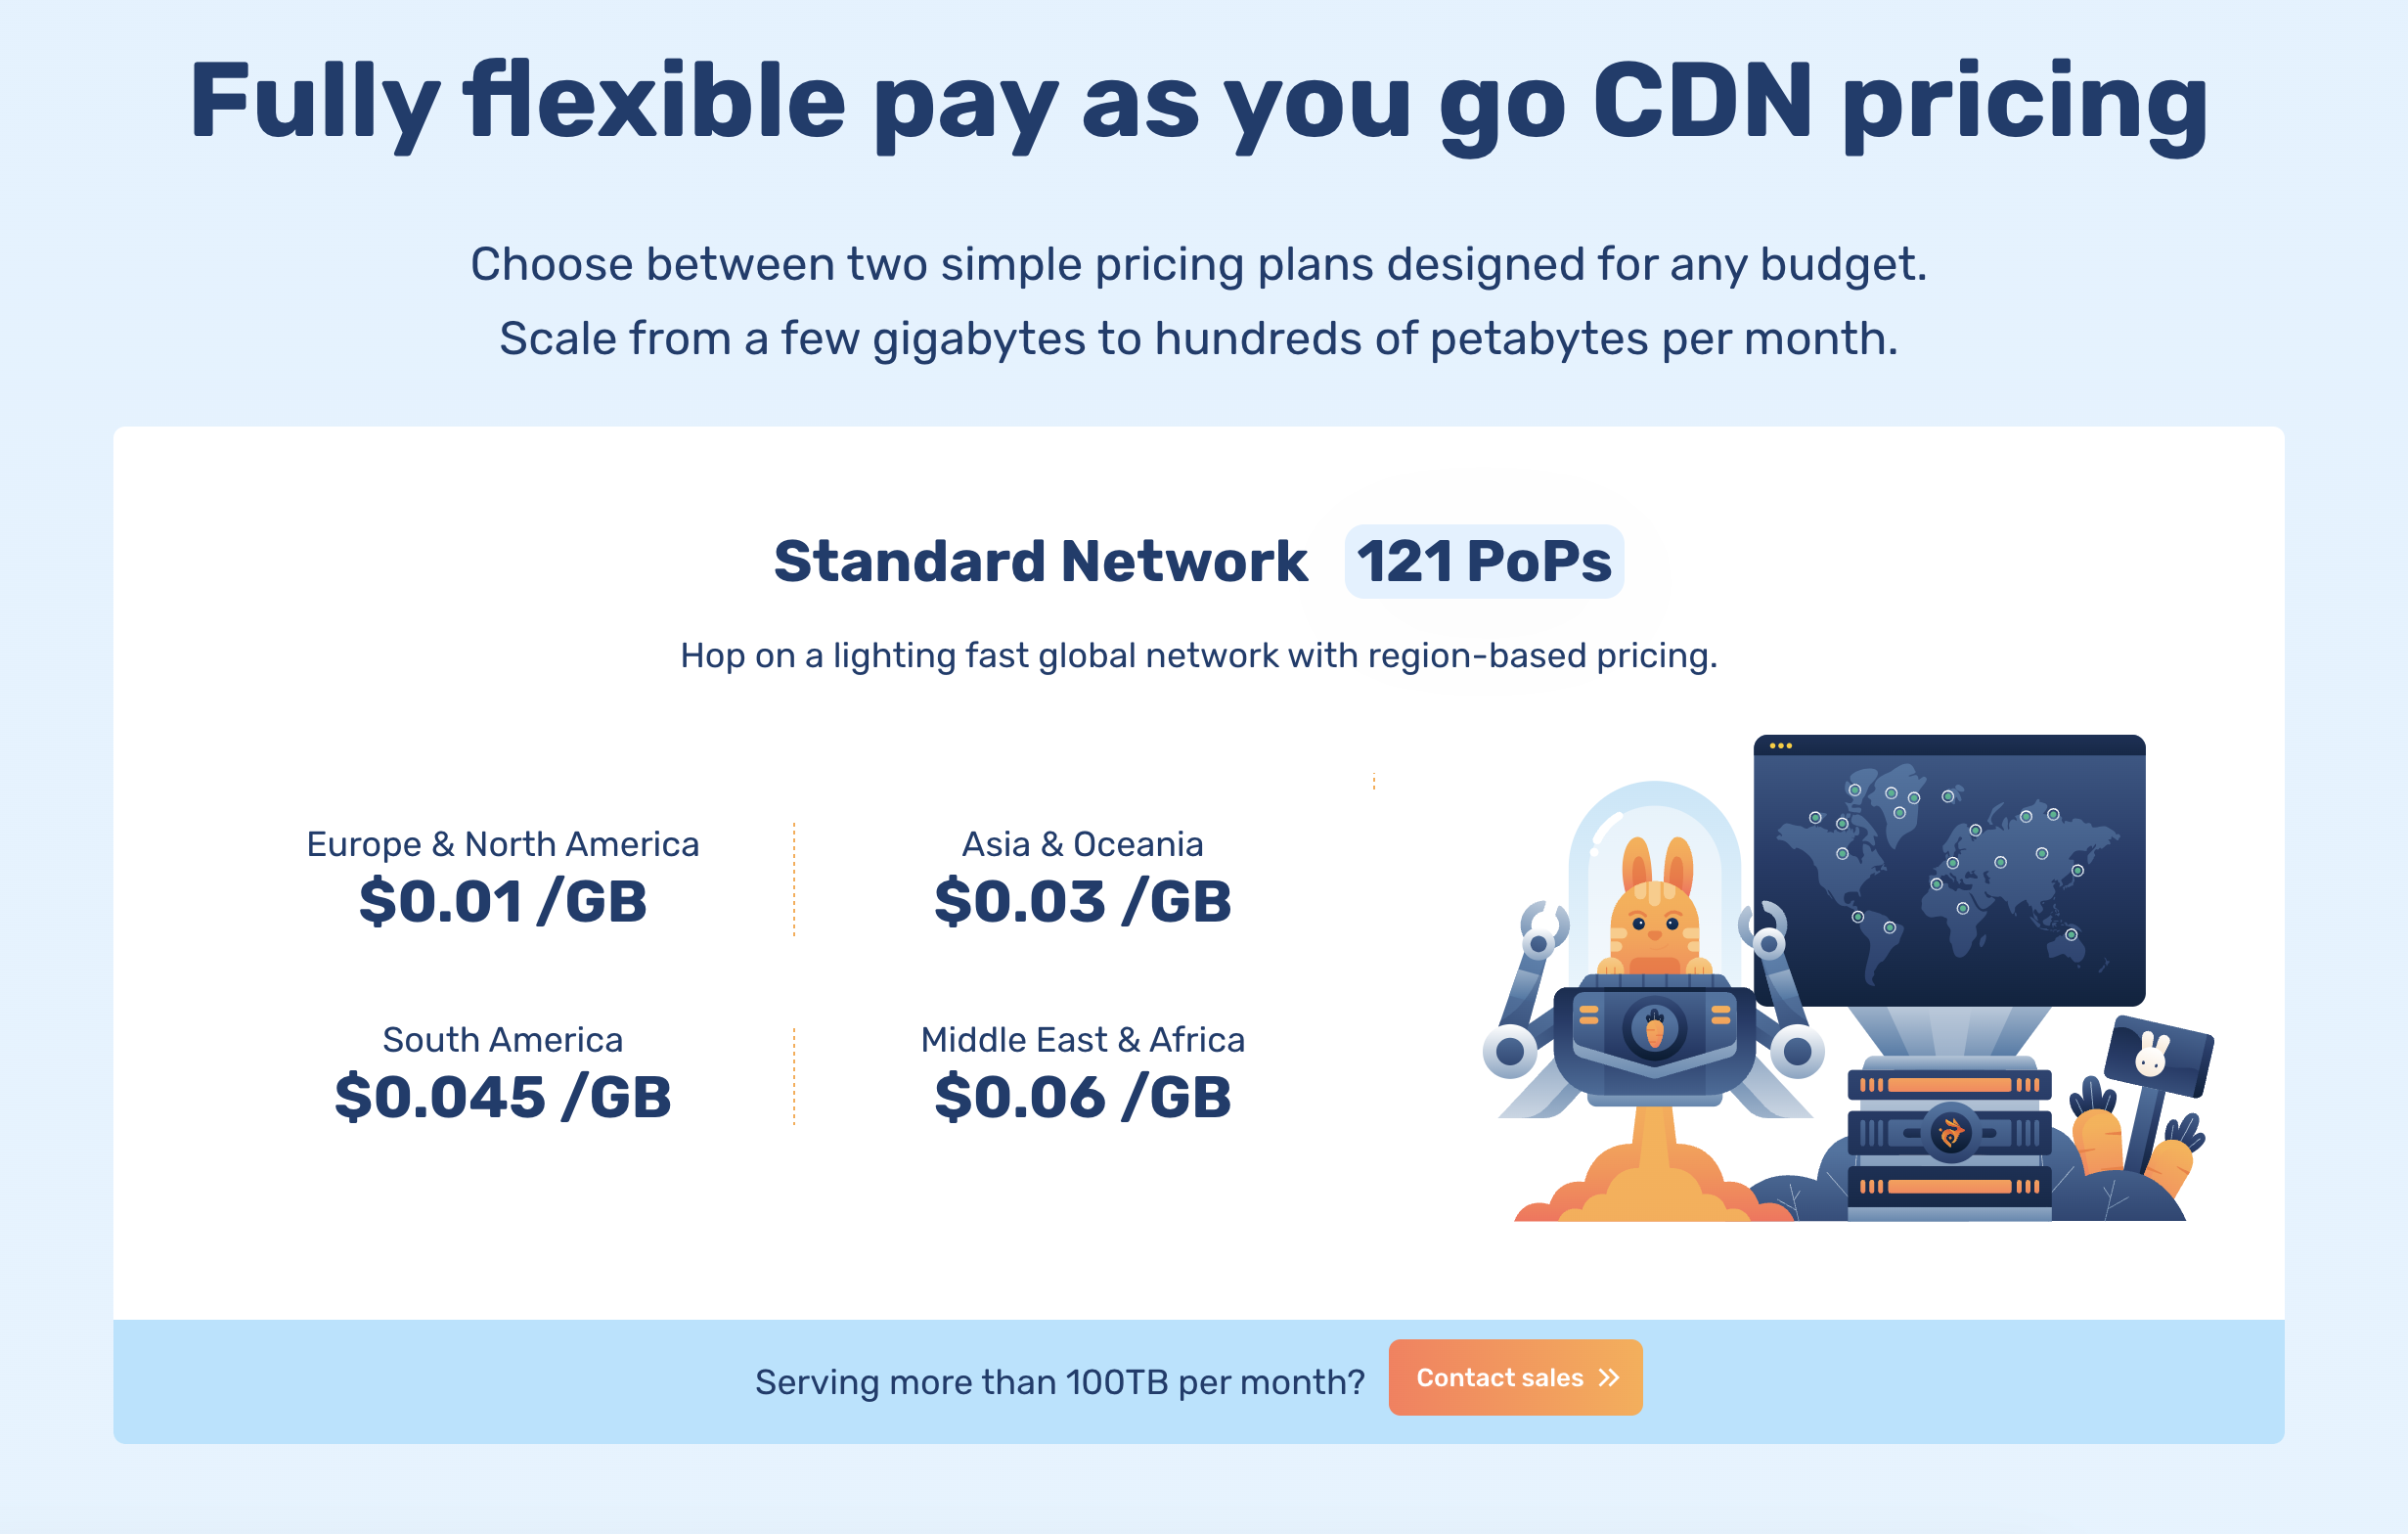
Then I found BunnyCDN, probably Cloudflare's biggest competitor. They have a pay-as-you-go pricing model, an API that I could use to manage customer sites, and servers all around the world. Sounds like a perfect match!
Are the speed gains measurable?
Alright, before we dive into the depth of setting up BunnyCDN and Ghost, let's take a quick peek at what this setup did for our website's speed. Just so you know, the only change I've made so far is adding BunnyCDN to the mix.
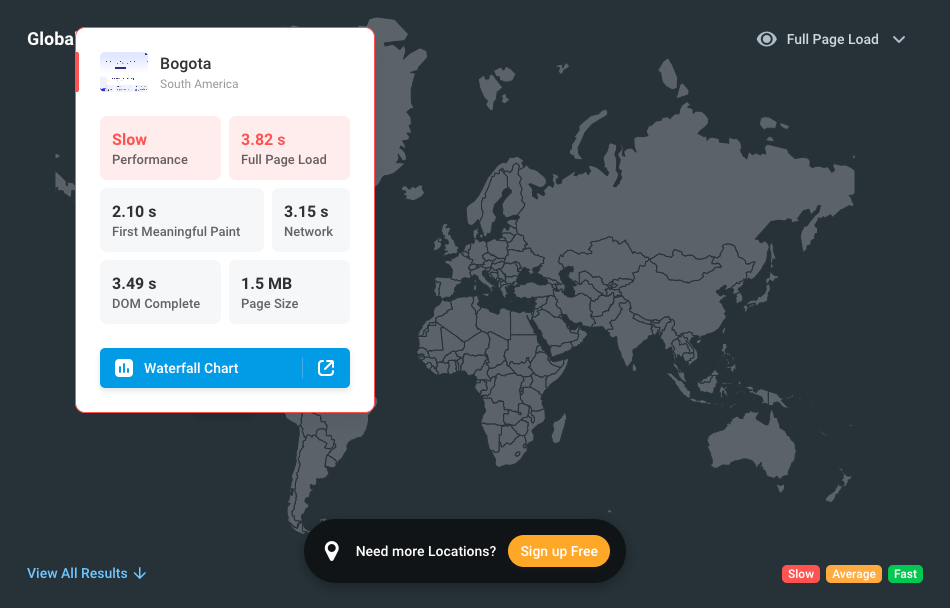
I ran a couple of speed tests from Bogota, Colombia, the location that had the worst connection to our server. I did one test before BunnyCDN worked its magic, and one after.
Here is how the page load looks like before any optimisation:
And this is with the CDN enabled:
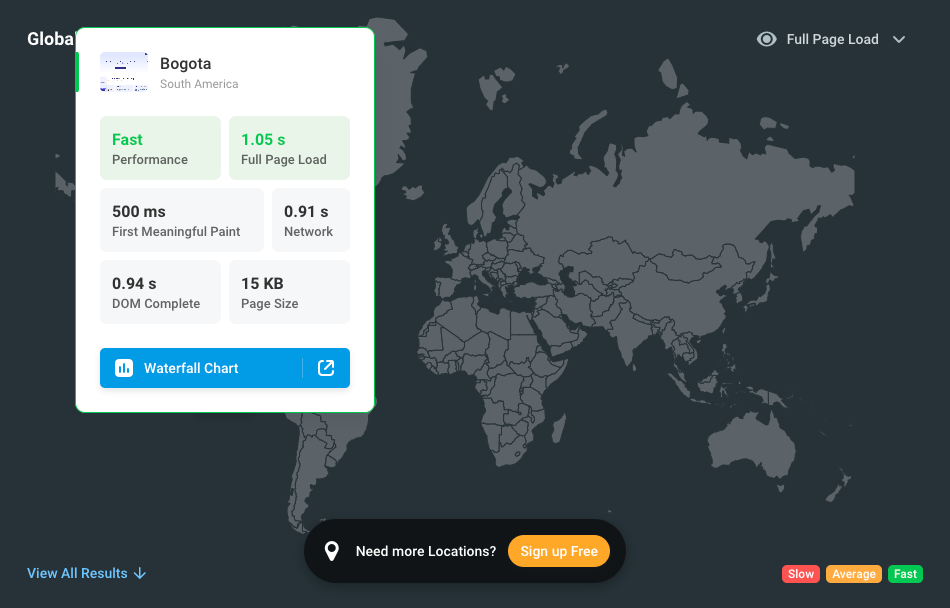
Before the implementation of BunnyCDN, it took the website 3.82 seconds to load. After? Just 1.05 seconds. We're talking about going from a sloth to a cheetah here, slashing the wait time by over 70%!
Setting up BunnyCDN with Ghost CMS
So, I was scrolling through the Ghost forum and bumped into this guide from 2021 about setting up BunnyCDN with Ghost. It's a good starting point, but you know how it is, things change. BunnyCDN's had a bit of a makeover since then. So, let's break down the steps I followed to get BunnyCDN working with all the latest features for a Ghost CMS site.
To get things started, go ahead and create a BunnyCDN account*.
Setting up your domains
To start things off, here is a brief overview of how BunnyCDN actually works: it grabs your website's content from an "origin URL" (in our case magicpages-co.mymagic.page), which is basically your website's home address. Then, BunnyCDN sets up a new subdomain (ending in *.b-cdn.net for BunnyCDN) to show a faster, cached version of your site from the nearest server to your visitor. Next, you just tell your main domain (magicpages.co for me) to use this new super-fast address. And voilà, your site's now supercharged!
For this to work, I'm assuming you've got a Ghost site all set up and linked to your main domain.
Next, you'll need to create a new (sub-)domain to act as the origin URL. Generally speaking, this URL will never be used, apart from BunnyCDN grabbing content for its cache. My origin URL is magicpages-co.mymagic.page. Link this domain to your Ghost site, but don't mess with the url setting in Ghost. Changing that can make your internal links go bust.
Basic configuration for BunnyCDN to work with Ghost CMS
Alright, now let's jump over to BunnyCDN and set up what they call a "pull-zone" – basically the control center of the new content delivery network for your website. Name your pull-zone (anything you like) and put that new sub-domain we talked about earlier into the "Origin URL" box.
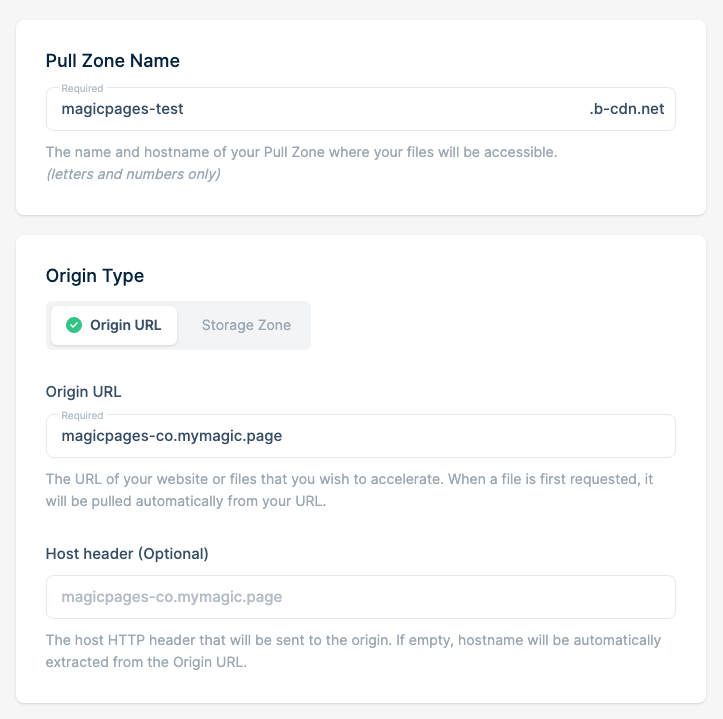
You'll see a bunch of other settings on this page. Most of the time, you can just leave these as they are, unless you specifically want to choose options like picking a high volume tier or turning off certain areas of the world. When you're ready to go, hit that orange button at the bottom.
Next, BunnyCDN will show you an "Instructions" page. It'll talk about swapping URLs for static files. Honestly, I didn't bother with this step. In the final result, it didn't make a big difference for me. If you want to try it though, there's a helpful post by another Ghost user, if you're up for the challenge! Just know that Ghost uses the {{asset}} helper in themes to handle static files, so you basically need to rewrite some URLs in your proxy.
If you're like me and want to keep things simple, just click "Skip instructions" and move on.
Settings to make Ghost work as it should
Once you're in your BunnyCDN pull-zone, the first thing to do is head to the "Edge Rules" section. This is where we make specific rules that help BunnyCDN work with Ghost and its latest features.
Because here's the tricky part about using CDNs like BunnyCDN: they love to cache everything to make it load faster. In the end, that's exactly what you want, right?
But if you're running a membership business on your Ghost site, caching everything isn't ideal. Picture this: one person logs in, BunnyCDN caches that page, and then the next visitor sees the first person's logged-in page. Not cool.
The same rule applies to the /ghost part of your site, where you do all your website editing and content creation. We don't want this section cached either, because it would make your content creation flow painfully complicated.
Now, let's get ahead and set up some edge rules to prevent those caching mishaps. On the "Edge Rules" page in BunnyCDN, look for the "Add New Rule" button. It's the orange one, you can't miss it.
Once you click on it, you'll need to fill in a few details. First, give your rule a name that makes sense to you. In the Action dropdown, pick "Override Cache Time," and then set the "Cache Time in Seconds" to 0. This means you're telling BunnyCDN not to store these pages. Keep the "Condition matching" on "Match any."
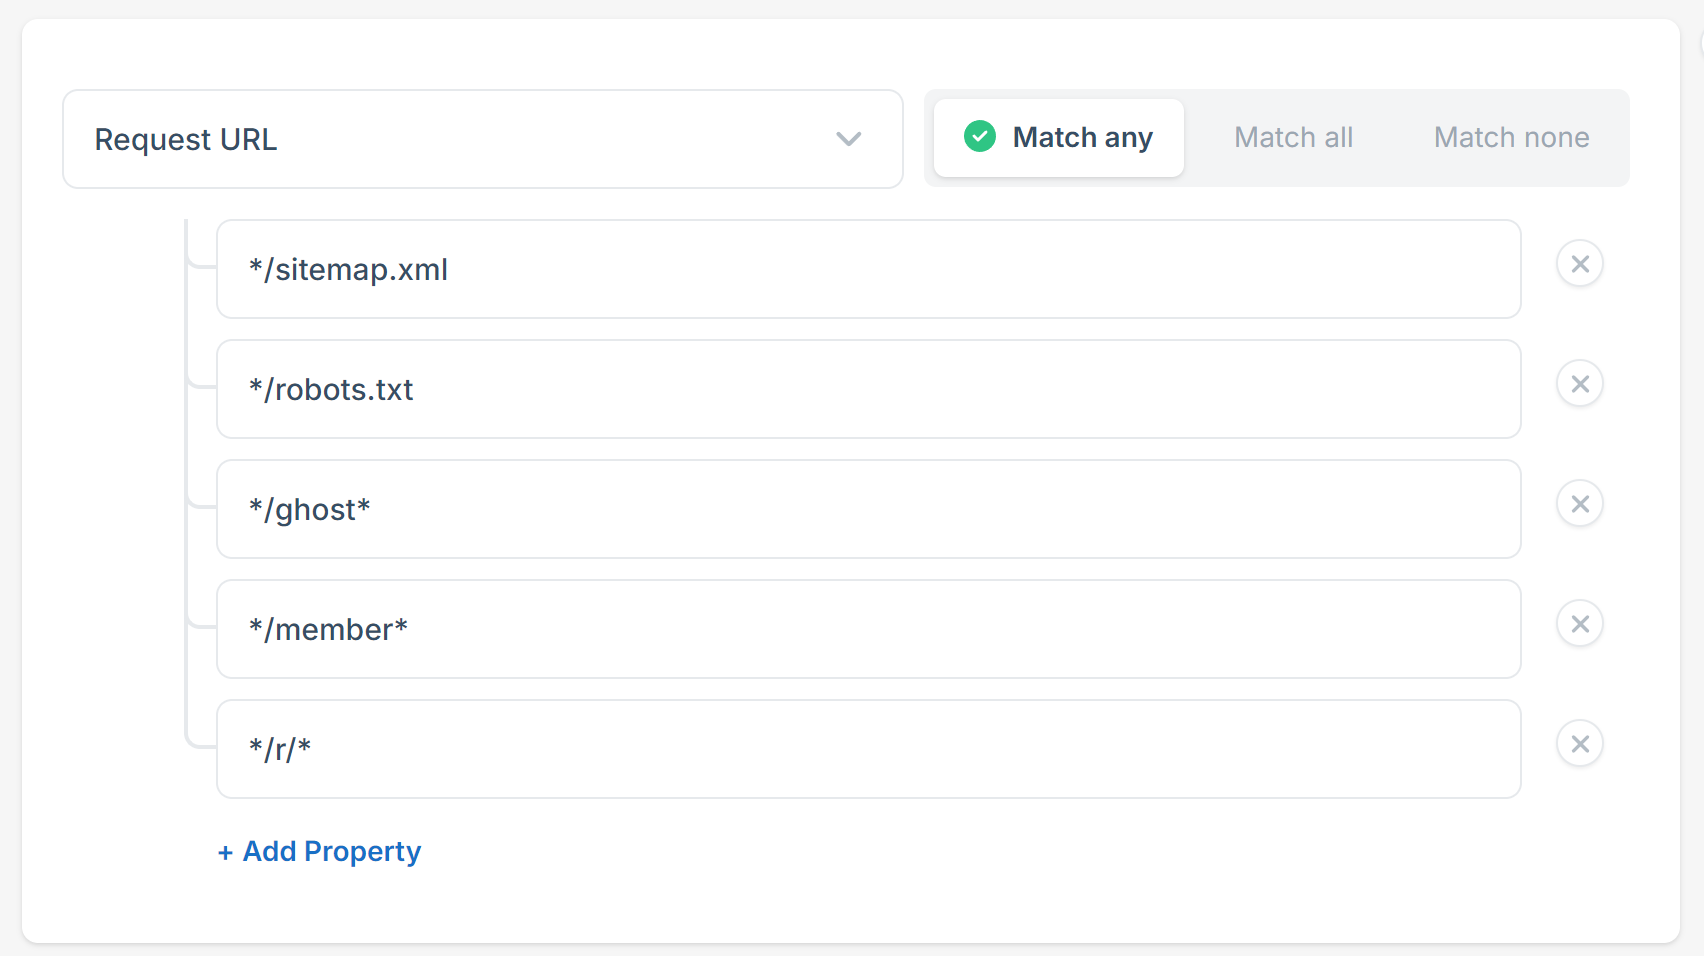
Now, here's the important part. We're going to add four conditions to make sure the right parts of your site don't get cached:
*/ghost*(this keeps your editing area fresh)*/members*(so each member sees their own stuff)*/sitemap.xml(we don't want an outdated sitemap of your site)*/robots.txt(to keep the instructions for search engines up-to-date)*/r/*(these are links from your newsletters – we do not want to cache these, since this can artificially increase your click count)
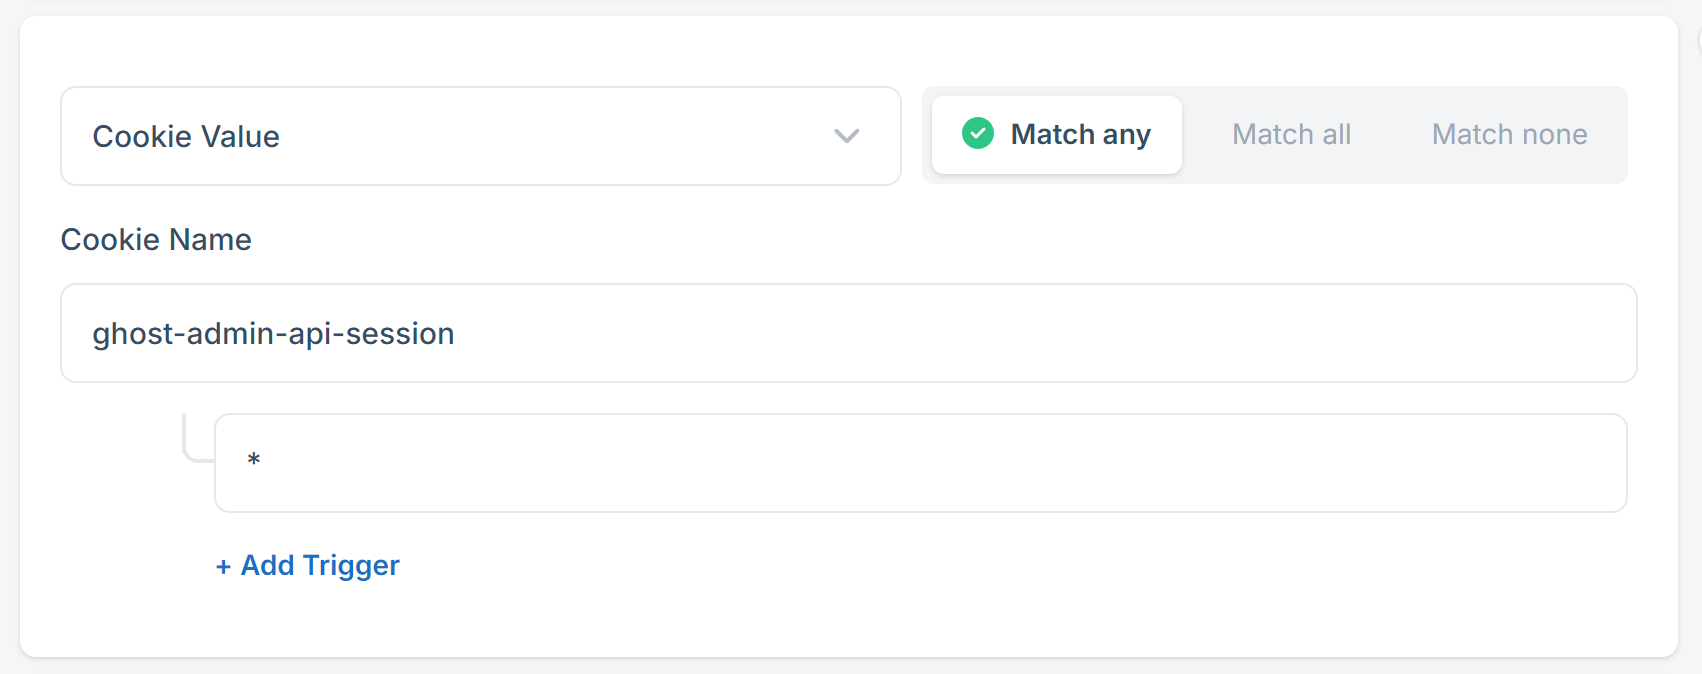
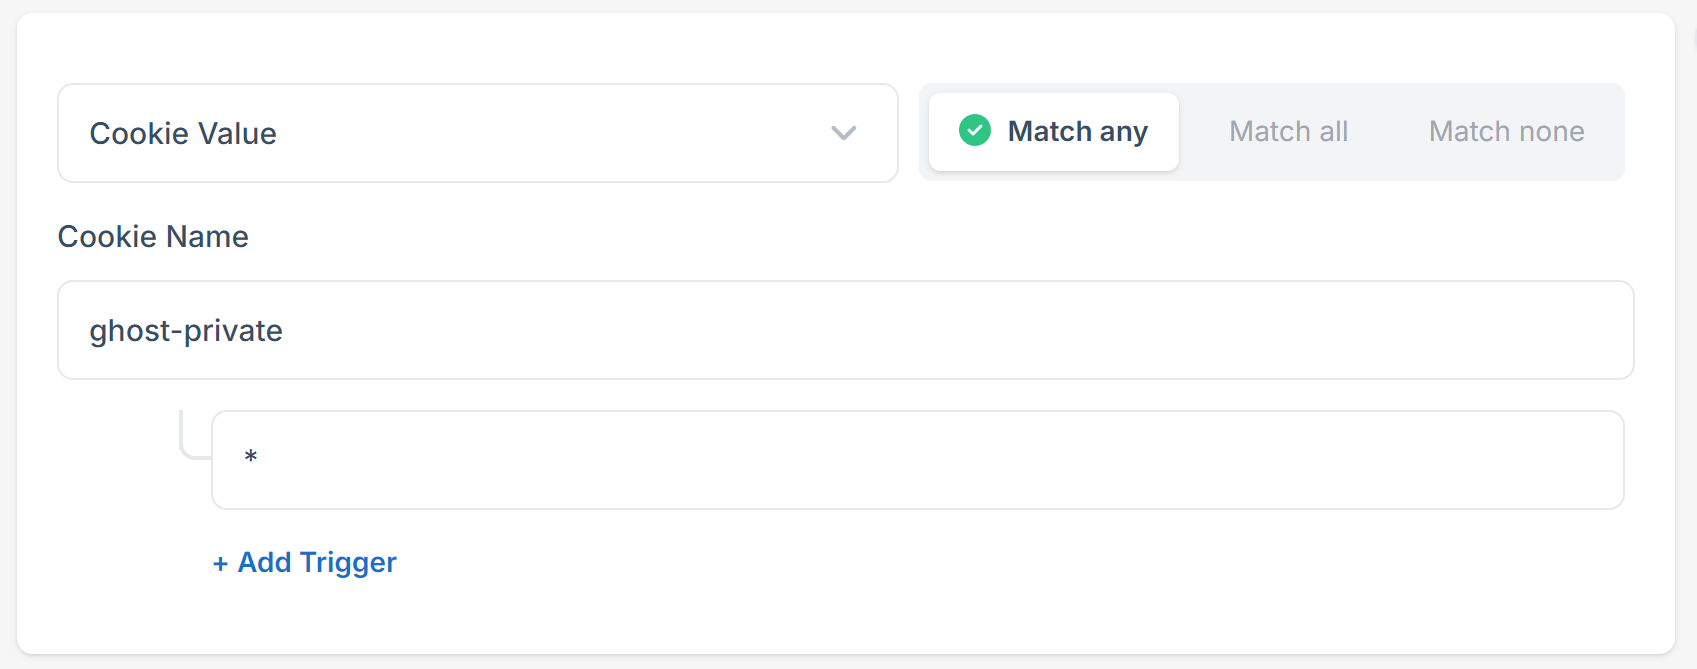
Additionally, there are a few cookies we want to keep in mind. Ghost only sets cookies when they are necessary. These are not marketing cookies (I also wrote about GDPR and private in Ghost), but have three very specific purposes:
ghost-admin-api-session– identifies a staff memberghost-members-ssr– identifies a logged in memberghost-private– indicates that the user has authenticated on a password-protected private Ghost site
Now, let's add these edge rules. This time, the "if"-condition is Request Header. The Header Name is cookie , and the value is the ones I have added above. Add rules for all three of these.

So, now that we created this edge rule, let's save it and create another. Click "Add New Rule" again, and put in the same details as before. But this time, change the action to "Override Browser Cache Time." Save this rule too, and you can check edge rules off your list.
Now, head over to "Caching" -> "General". Here we need to turn off two settings:
- Query String Sort: Turn this off. It's crucial for making sure your members can log in properly.
- Strip Response Cookies: This also needs to be off. If it's on, you'll have trouble logging into your Ghost admin area.
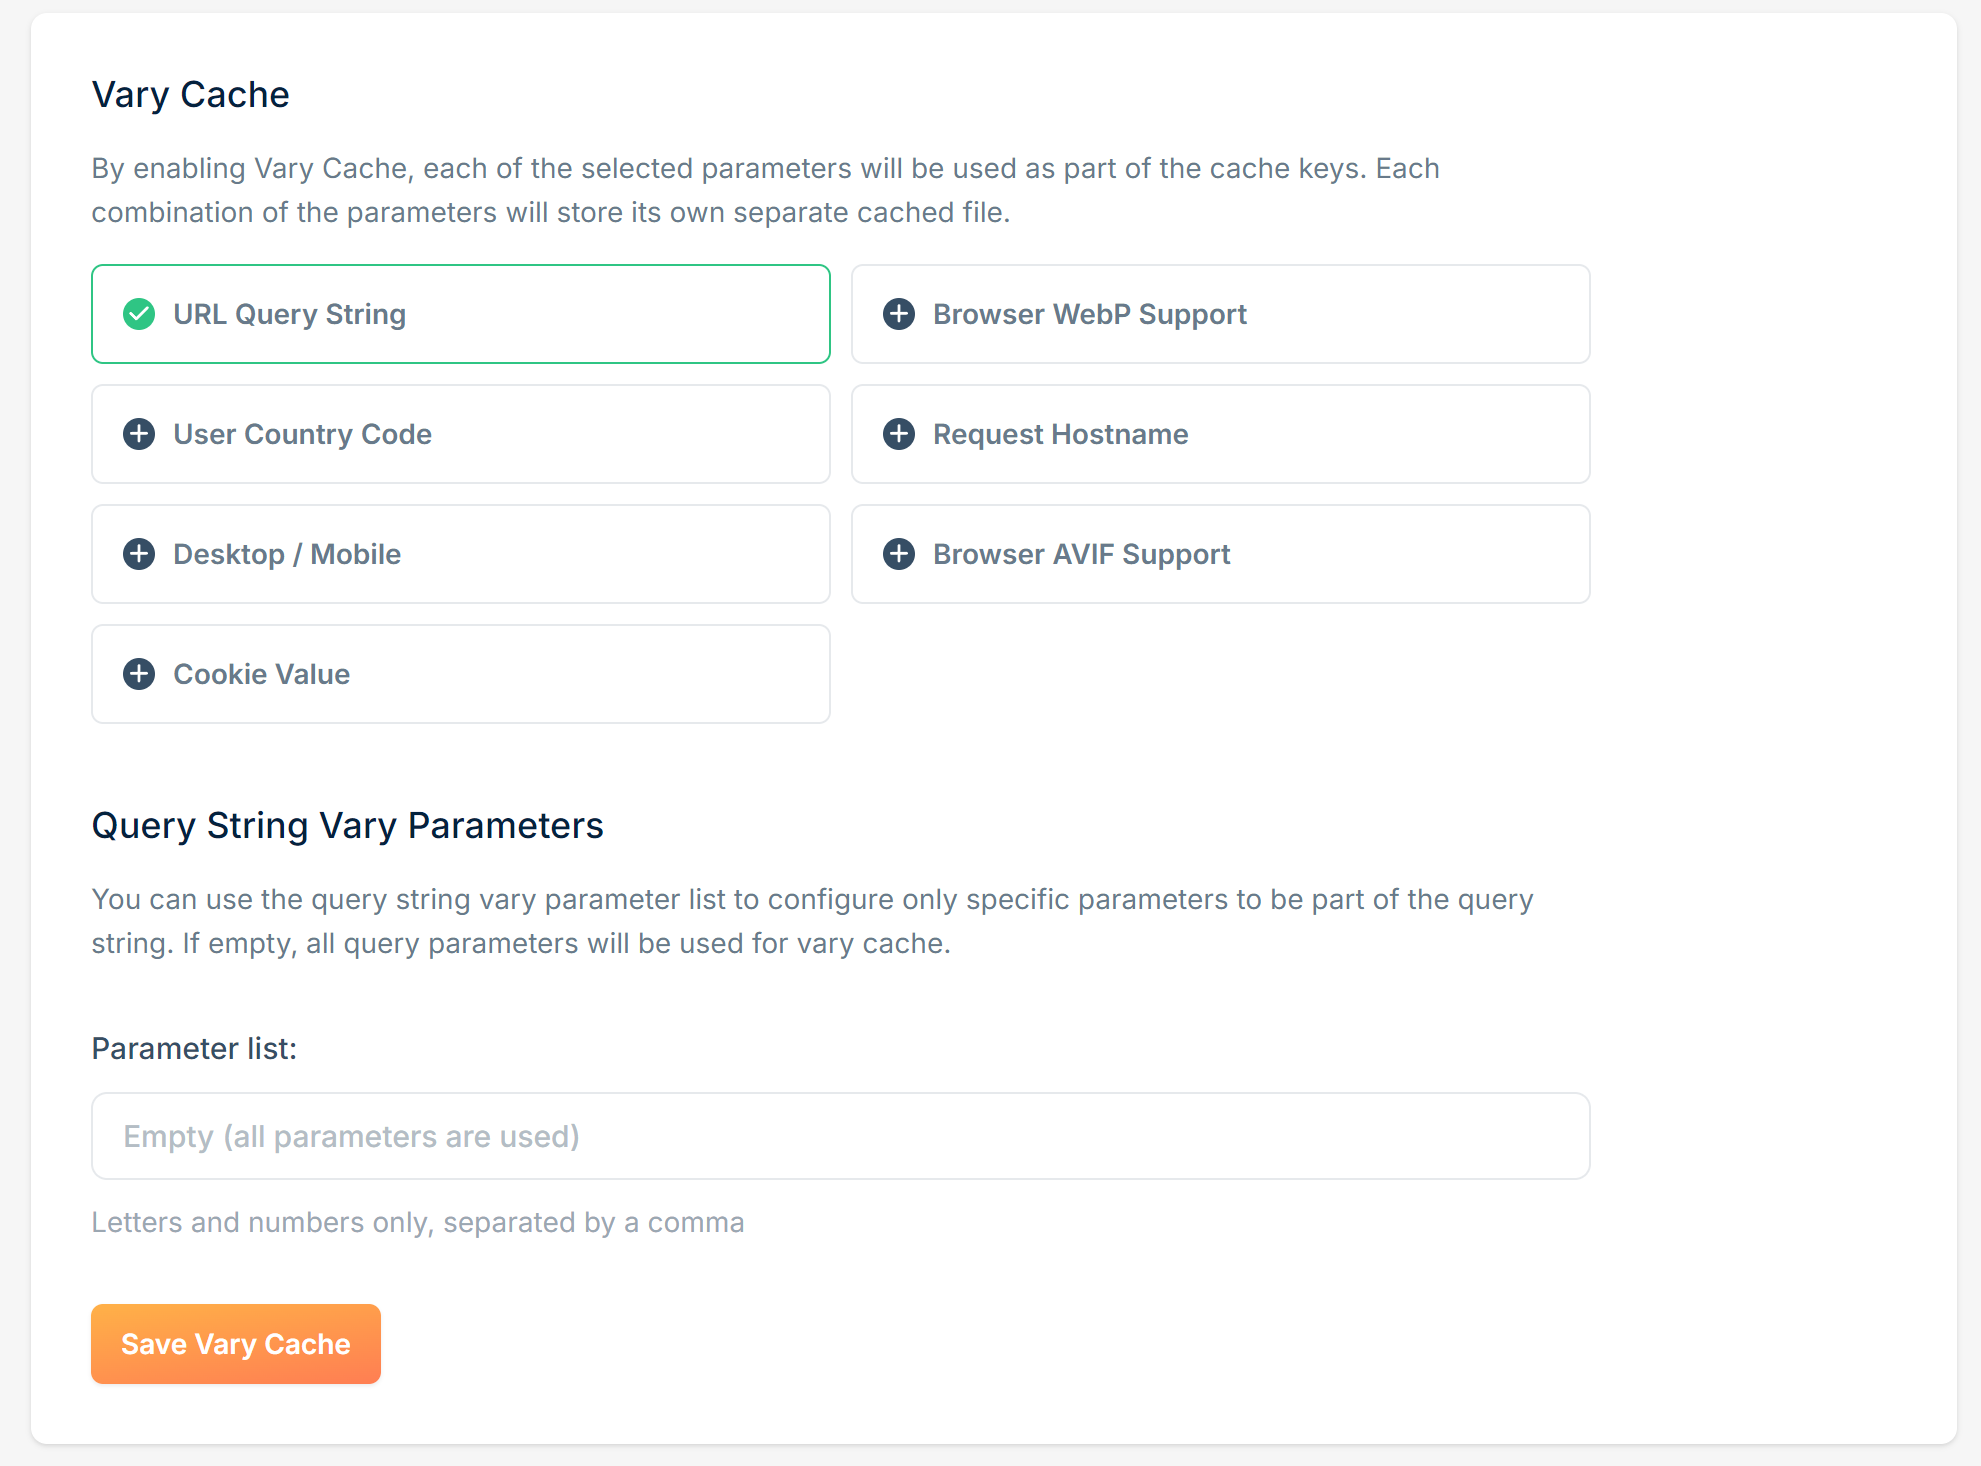
- Vary Cache: The Vary Cache makes sure that for certain differentiators different versions of the cache are stored. This comes in very handy for Ghost. Assets in Ghosts are versioned and have a
?v=...query string added to them. So, let's activate theURL Query StringVary Cache. You can also have a look at the other values to see if they make sense for you. Then save it.
Testing Your Setup to Make Sure Everything's Running Smoothly
Now, it's time to see if everything works. Let's do a quick test. Go to "General" and then "Hostnames" in your pull-zone. You'll see a hostname there ending in *b-cdn.net. Copy this and paste it into your web browser's address bar.
What you should see is your website, just as it normally looks. If it's not showing up right, there might be a hiccup in the settings we just did.
To dig deeper, open your browser's developer tools. You can usually do this by pressing F12, or right-clicking on the page and selecting "Inspect." Once there, find and click on the "Network" tab. This is basically where we can see all the communication between your web browser and the server. Now, with this tab open, refresh your website.
In the list requests, look for one that says member/. Click on it and go to the "Headers" section. In the "Response Headers," you want to find an entry that says Cdn-Cache: BYPASS.

This is a good sign – it means that this part of your site isn't being cached by BunnyCDN, which is exactly what we want.
Linking Your Main Domain to BunnyCDN
Now it's time to bring your main website domain (in my case magicpages.co) into the BunnyCDN world. So far, we've only been working with the new origin URL and the *.b-cdn.net domain. Let's connect the dots.
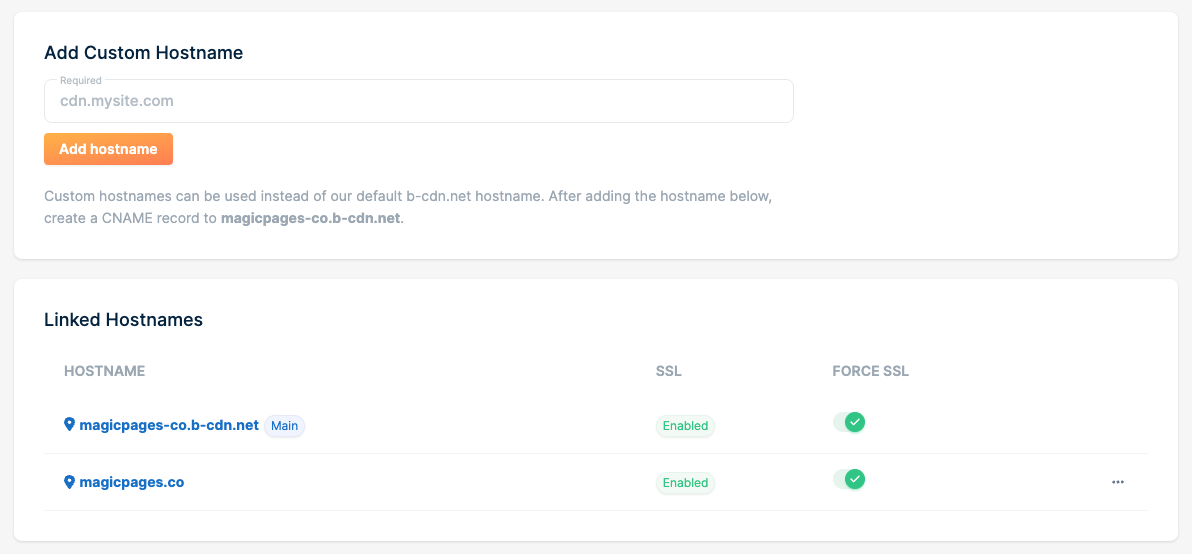
Go to your BunnyCDN pull-zone settings and navigate to "General" -> "Hostnames." There, you'll see a field to enter your main domain. Type it in and click "Add hostname." BunnyCDN will then give you some steps to follow.
The main thing you need to do is update a CNAME record to point to your *.b-cdn.net hostname. After you've done that, make sure to hit the "Enable" button to set up an SSL certificate (to keep connections to your website secure) and turn on "Force SSL".
And that's it! Your Ghost site and BunnyCDN are now working together. Visitors from anywhere in the world should see a speed boost when they visit your site.
A Quick Gotcha: Bunny Optimizer
BunnyCDN also offers "Bunny Optimizer" for any pull zones you create there. In their own words, this is what it does:
Bunny Optimizer helps maximize performance and reduce traffic usage. Automatically compress image sizes by up to 80%, optimize your images for desktop and mobile devices, minify CSS and JavaScript files and build your website with ease with on the fly image manipulation API.
So, that sounds cool, right? Automatically compressing images? I wanted to try how this works with Ghost, so I activated it.
Everything went smoothly – I didn't see any issues and images were indeed optimised. Only a few days later, I encountered a problem.
I wanted to log in on my Ghost site's admin panel. However, when visiting the /ghost route, I just got an endless loading animation. Upon inspecting the browser console, I saw that some Javascript files threw errors:
Uncaught SyntaxError: Unexpected token ':' (at vendor-f6856af9fcd8ab6533f2a4339ececbc8.js:1:99083)
chunk.761.5cfbe0d0f8ec7aefe7bc.js:1 Uncaught SyntaxError: Unexpected token ')' (at chunk.761.5cfbe0d0f8ec7aefe7bc.js:1:1739849)
ghost-0bd2fe0aa8d6ffee7bedfa95f6042159.js:1 Uncaught ReferenceError: define is not defined
    at ghost-0bd2fe0aa8d6ffee7bedfa95f6042159.js:1:14
(anonymous) @ ghost-0bd2fe0aa8d6ffee7bedfa95f6042159.js:1
ghost/:1 Unchecked runtime.lastError: A listener indicated an asynchronous response by returning true, but the message channel closed before a response was received
These were the errors that were thrown by Ghost, when enabling Bunny Optimizer and accessing the /ghost route
As a few days have passed since the activation of Bunny Optimizer, I didn't put one and one together right away, but a bit of trial and error put me in the right direction.
Bunny Optimizer isn't compatible with the /ghost route.
The solution is quite simple though. Go back to your Edge Rules and create a new one. This time, select "Disable Bunny Optimizer" as action and put */ghost* as request URL.
Now, I can access the Ghost CMS admin panel again 🎉
About Jannis Fedoruk-Betschki
I'm the founder of Magic Pages, providing managed Ghost hosting that makes it easy to focus on your content instead of technical details.
